AI Content Creation Assistant — Part 5: Deployment


Welcome to part 5 of the AI content creation assistant series. In this series, we are building a full-stack generative AI application using TypeScript and Python. In the last part, we added a user interface to our solution using React. With this change, we now have a full-stack application ready to be deployed and tested. In this part, we will containerize our React and FastAPI application and deploy it to a Kubernetes cluster.
Series
- AI Content Creation Assistant — Part 1: GenAI Workflows
- AI Content Creation Assistant — Part 2: FastAPI
- AI Content Creation Assistant – Part 3: WebSockets and Persistent Storage
- AI Content Creation Assistant – Part 4: User Interface
- AI Content Creation Assistant - Part 5: Deployment
Prerequisites
Before you begin, ensure you have the following:
- Familiarity with Docker.
- A running Kubernetes cluster.
- kubectl and helm are configured to interact with your cluster.
- Basic understanding of Kubernetes concepts and YAML syntax.
Overview
Throughout this series, we have iteratively improved our content creation Generative AI application. We started with a simple proof of concept (POC) in a Jupyter Notebook and then transitioned to a full-stack application built with React.js and the FastAPI framework. Now that we have an interactive website, a server to interact with Large Language Models (LLMs), and operations related to content creation workflows, let's deploy our app!
Technologies used
Here are the technologies used to deploy an on-premises solution:
- Kuberenetes
- Object Storage - Minio
- Relational Database - Postgres
- Secrets manager - HashiCorp Vault
- Nginx Ingress - Ingress Controller
- MetalLB - Load Balanacer
Getting Started
Before we can deploy our applications to Kubernetes, we need to create Docker files and build Docker images that will be deployed to a Kubernetes cluster. A Docker image is an executable package of software that includes everything needed to run an application.
Packaging our React application
There are a few steps required to create the Docker image that will contain our executable web application. First, we need to create the production build of our React app. The production build of a React application includes minified JavaScript bundles, optimized assets, and light-weight source maps. When we scaffolded our React application using Rspack, it added the necessary command in our package.json to create the production build. The default configuration will suffice for now, as optimizing a bundler's production build will be out of the scope of this post.
After cloning the source code from GitHub, run the following command:
npm run buildYou can find what this command links to by reviewing the package.json scripts section. You'll see that this executes the following rspack command:
"build": "rsbuild build NODE_ENV=production"This will build the production output of our React code. We manually set the NODE_ENV to production in the event our build ecosystem is missing this variable. Setting the node environment to production ensures our build step does not include development dependencies only needed during local development.
After running the build command, you should see a new dist folder in the root directory. A content subfolder contains index.html and a static directory consisting of minified JavaScript and CSS files. With our production output, we need something to serve the static assets. We will use an NGINX web server. Here is the final Docker file that builds our image, and we will walk through it:
FROM --platform=linux/amd64 node:24-slim as builder
WORKDIR /src
COPY package*.json ./
RUN npm install
COPY . .
RUN npm run build

FROM --platform=linux/amd64 nginx:1.28
EXPOSE 80
COPY --from=builder /src/dist /usr/share/nginx/html
COPY nginx.conf /etc/nginx/conf.d/default.conf
Stage 1: Building
- First, we set the base image to be
node:24-slimand specify a platform. I added this step because I built the images on my Mac, and it will default to ARM, which isn't compatible with the Linux servers in my homelab. Soon, this process will be done through a CI/CD pipeline running on Linux virtual machines so that the additional platform command won't be necessary. - Sets the working directory to
/srcinside the container. This is where the application's code will be copied and built. - Copy package.json and the associated lock file to the working directory. These files are used to install the project's dependencies.
- Install NPM packages described in the package.json dependencies section.
COPY . .Copies the entire application code from the host machine to the working directory within the container.- Executes the build script defined in the
package.jsondescribed earlier.
Stage 2: Production Web Server
- As before, we specify the base image
nginx:1.28and set its platform to AMD to ensure server compatibility. - Expose port 80, the default port for HTTP traffic, where NGINX will serve the files.
COPY --from=builder /src/dist /usr/share/nginx/htmlcopies the build files from the/src/distdirectory to the/usrshare/nginx/htmldirectory in the NGINX container. This is the default location from which NGINX serves files.- We define a custom
nginx.conffile that will be copied into the container, replacing the default configuration of the NGINX web server. Allowing us finer control of how the web server handles incoming requests, caching, and other settings.
This completes our two-step build process.
Packing our FastAPI application
FROM --platform=linux/amd64 python:3.12-slim as build

WORKDIR /src

COPY requirements/requirements.txt .

RUN pip install --no-cache-dir -r requirements.txt

COPY . .

ENTRYPOINT ["python", "-m", "uvicorn", "src.main:app", "--host", "0.0.0.0", "--port", "8000"]- We select the base image
python:3.12and specify the platform as Linux/amd64. - We set the working directory as
/src - We copy requirements.txt into the container.
- We install the Python dependencies.
COPY . .Copies the entire application code from the host machine to the working directory within the container.- We define an
ENTRYPOINTwhich essentially runs the command to start our FastAPI server.
We have successfully built our images, so we need a place to store them to be deployed to a Kubernetes cluster. Depending on how you are hosting your Kubernetes cluster, it ultimately defines your next set of steps. If you are using minikube or kind, you can pull in the images you've built locally so they are accessible for your cluster. Alternatively, you can use a Docker registry such as DockerHub or an equivalent offering from a cloud provider such as AWS Elastic Container Registry.
With DockerHub, you are allowed one private registry. Since we are limited to one on the free tier, we will use tagging to distinguish between our different Docker images. Proceed to DockerHub.com and create a free account.
Once you've successfully logged in:
- Navigate to the repositories page.
- Click
Create a repositorybutton - Add a name to your repository, optionally add a short description, and click the private checkbox.
- Click
Create
With this, you have a private registry accessible online. We can now build our images and push them to this repository. Following the same sequence of steps, navigate to the root of each project and run the following command:
docker buildx build --push -t <username>/<repository>:<tag> . We use the Docker buildx command to build our image from the defined Docker files. We push the image to our registry using <username>/<repository> with an optional <tag>. The period at the end indicates the Dockerfile can be found in the current directory. Since we are sharing the same repository for multiple images, the web app has a tag of f1 , and the FastAPI app a tag of b1.
Kubernetes deployment
Kubernetes has manifest files that we can create to manage different Kubernetes objects. To get started, we will create deployment files to deploy our images to our cluster. Each manifest file has four main sections you need to fill out:
- apiVersion
- kind
- metadata
- spec
ApiVersion depends on which Kubernetes resource you are creating. If you are curious which apiVersion you need, you can run kubectl api-resources to determine the correct apiVersion to use. For deployments, we use apps/v1 and define the kind as Deployment. Metadata contains information about the Kubernetes object you create, such as the name, namespace, and additional labels. Lastly, the spec defines the desired state and configuration of a resource.
React deployment manifest
Let's review each deployment file for our web app and backend service:
apiVersion: apps/v1
kind: Deployment
metadata:
  name: workflow-app
spec:
  selector:
    matchLabels:
      app: workflow-app
  template:
    metadata:
      labels:
        app: workflow-app
    spec:
      containers:
      - name: workflow-app
        image: docker.io/<username>/<repository>:f1
        imagePullPolicy: Always
        resources:
          requests:
            memory: "1Gi"
            cpu: "250m"
          limits:
            memory: "2Gi"
            cpu: "500m"
        ports:
        - containerPort: 80
      imagePullSecrets:
      - name: docker-hub-secret
- Define the
apiVersionand correspondingkindof Deployment. - Give the deployment a name of
workflow-app. - In the spec section, we define a few things
- A selector to match the label defined in the template section.
- A template section that defines the blueprint of the state and configuration of the given resource.
- In the template, we add the label
app: workflow-app. This matches the selector matchLabels attribute and will later be used by a Kubernetes service object so the deployed pod can communicate within the cluster. - We define our container:
- name
- Image: match this to your deployed image path
- imagePullPolicy: always pull the latest image
- Resources we will allow the pod to request and a limit it can't go over.
- Since this is an NGINX web server that is serving our React application, we expose port 80 to match the container's exposed port defined earlier
- In the template, we add the label
- We provide a secret that contains credentials that allow Kubernetes to pull from the private repository.
You will need to create this secret; you can do so by running the following command. Remember to fill in the necessary details:
kubectl create secret docker-registry docker-hub-secret --docker-username=<username> --docker-password=<password> --docker-email=<email>FastAPI deployment manifest
apiVersion: apps/v1
kind: Deployment
metadata:
  name: workflow-service
spec:
  selector:
    matchLabels:
      app: workflow-service
  template:
    metadata:
      labels:
        app: workflow-service
    spec:
      containers:
      - name: workflow-service
        image: docker.io/solstics/homelab:b1
        imagePullPolicy: Always
        resources:
          requests:
            memory: "1Gi"
            cpu: "250m"
          limits:
            memory: "2Gi"
            cpu: "500m"
        ports:
        - containerPort: 8000
        env:
        - name: OPENAI_API_KEY
          valueFrom:
            secretKeyRef:
              name: openai
              key: openai
        - name: TAVILY_SEARCH_API_KEY
          valueFrom:
            secretKeyRef:
              name: tavily-search
              key: tavily-search

        - name: MINIO_ENDPOINT
          valueFrom:
            secretKeyRef:
              name: minio
              key: minio_endpoint
        - name: AWS_ACCESS_KEY_ID
          valueFrom:
            secretKeyRef:
              name: minio
              key: minio_access_key_id
        - name: AWS_SECRET_ACCESS_KEY
          valueFrom:
            secretKeyRef:
              name: minio
              key: minio_access_key
        - name: DATABASE_URL
          valueFrom:
            secretKeyRef:
              name: postgres
              key: content_db_sync
        - name: ASYNC_DATABASE_URL
          valueFrom:
            secretKeyRef:
              name: postgres
              key: content_db_async
        - name: ALLOWED_HOSTS
          valueFrom:
            configMapKeyRef:
              name: content-service-config
              key: allowed_hosts
        - name: MINIO_BUCKET_NAME
          valueFrom:
            configMapKeyRef:
              name: content-service-config
              key: minio_bucket
      imagePullSecrets:
      - name: docker-hub-secret
Similar descriptions apply to our backend service deployment file. We define an apiVersion, kind, metadata, and imagePullSecrets. The spec is similar, consisting of a selector and template section. We define the state and configuration of our resource, specifying that we want the b1 tag. What's different is the addition of the env section. Our FastAPI server expects various environment variables that we defined while building our applications. Such as API keys, database, and Minio credentials. For sensitive material, we use Kubernetes secret objects and reference them using secretKeyRef. For configuration settings, we can use Kubernetes config maps. We reference them using configMapKeyRef.
Dealing with Secrets
The secrets and config maps must be created before deploying the workflow service. Defining how to set up a secret store and accompanying secrets is out of scope, but will be written up in my home lab series. For now, I'll give you the general prescriptive guidance:
- Pick a tool that can interact with your secret manager, such as External Secrets Operator.
- Define a secret store for your cluster.
- Link the secret store to your secrets manager.
- Secret manager examples are HashiCorp Vault or AWS KMS.
- Add secrets in your secret manager, then define a corresponding YAML file and apply it to your cluster. You can see an example in this post associated rep: minio-secret.yaml
Kubernetes service files
In addition to our deployment files, we need to define corresponding service files. Service files allow us to expose a network application running in one or more pods. A few different types of service files can be read about here: Kubernetes Service Types. For our setup, we will use type ClusterIP as we want our services accessible only from within. We will define an Ingress controller to expose our services to external traffic. To define a service object, we specify the four required fields:
apiVersion: v1
kind: Service
metadata:
  name: workflow-service
  namespace: default
spec:
  ports:
  - port: 80
    targetPort: 8000
  selector:
    app: workflow-service
As before, we define the apiVersion and kind. Note that the service apiVersion is simply v1. We call this service workflow-service and deploy it to the default namespace. We define the port mapping, mapping port 80 from external traffic to the pod's internal port 8000, which we exposed earlier in the workflow service definition. We use a selector to map this service to the workflow-service label defined earlier in deployment.yaml.
The same applies to our web server:
apiVersion: v1
kind: Service
metadata:
  name: workflow-app
  namespace: default
spec:
  ports:
  - port: 80
    targetPort: 80
  selector:
app: workflow-appSupporting technologies
Our full-stack application relies on Minio and Postgres to store its media assets and data. For this part, I will include guidance on running Postgres in your cluster, as I am a big fan of the Cloud Native PG Operator and use it to run multiple Postgres databases.
As for Minio, I run it as a containerized application from my Network Access Storage (NAS) through the TrueNAS Scale application store. It was simpler as I only used Minio for prototypes and typically use AWS S3 for work. As a challenge, you can review the Minio Kubernetes docs on deploying Minio to a Kubernetes cluster and test it out. Ultimately our workflow-service needs a URL and the required credentials.
Postgres
We need to install the Postgres operator into our cluster to get started.
helm repo add cnpg https://cloudnative-pg.github.io/charts
helm upgrade --install cnpg \
  --namespace cnpg-system \
  --create-namespace \
  cnpg/cloudnative-pg
If you aren't familiar with Helm, you can think of it as a package manager for Kubernetes, similar to npm or pip. We define a lot of manifest files when working on Kubernetes projects. Tools like Helm and Kustomize help lessen the burden of managing all these files and their variants to support multiple environments.
With the operator installed within our cluster we can now setup our database cluster. Following CloudNative PG recommendations, we will dedicate a single PostgreSQL cluster to a single database managed by a single microservice application. Per the CNPG FAQ, reserving a PostgreSQL instance for a single microservice-owned database enhances:
- Resource management: Each database instance's CPU and memory can be constrained according to resource management policies at the pod level.
- Physical continuous backup and Point-In-Time-Recovery(PITR)
- Application updates: without impacting other database owners
- Database updates: each application can decide which version of PostgreSQL to use, independently, and when to upgrade.
Let's create a database for our workflow-service:
apiVersion: v1
kind: Namespace
metadata:
  name: databases
  labels:
    name: databases

---

apiVersion: postgresql.cnpg.io/v1
kind: Cluster
metadata:
  name: content-db
  namespace: databases
spec:
  instances: 3

  bootstrap:
    initdb:
      database: content-server
      owner: content
      postInitTemplateSQL:
        - CREATE EXTENSION IF NOT EXISTS "uuid-ossp";

  storage:
    size: 5Gi

  monitoring:
    enablePodMonitor: true
The database YAML file contains two parts. The first part creates the namespace databases. I have all my databases in their own namespace; this isn't explicitly required, but I included it.
The helm installation previously introduced some new custom resource definitions (CRDs) we can use. For example, we can now use postgresql.cnpg.io/v1 as a apiVersion and kind: Cluster. We name our Cluster resource content-db and assign it to the namespace databases. We define 3 instances, creating a primary server that handles reads and writes. Along with two additional read replicas. You can reduce it to one, as it's a prototype and not required. However, the additional reads will be nice as you introduce different workloads that need workflow-service data. You can have other operations read from the replicas without impacting your primary database, which supports your application.
Continuing with our definition, we bootstrap a database called content-server and assign it the owner content. Furthermore, we enable the extension uuid-oosp so we can support the GUID columns used in various tables. We define 5Gi of local storage to each instance and enable monitoring so each pod exposes a /metrics endpoint to scrape metrics from.
Apply this YAML file to your cluster:
kubectl apply -f content-db.yamlWith this, the operator should create our database cluster. Next, you'll need to extract its credentials for use by the FastAPI server.
kubectl -n databases get secretsYou should see content-db-app. Each secret is base64 encoded so we need to decode the values to view them. Here's an example on how to grab the database password.
kubectl -n databases get secret content-db-app -o=jsonpath='{.data.password}' | base64 -d
I tend to grab the full uri, replace .data.password with .data.uri and use that as the environment variable for the workflow-service database credentials. Before successfully storing the data in this database, we must update its schemas by migrating. Typically, through CI/CD, when prompted to migrate database schemas, you'd spin up a container to run the migration. Recall we use alembic upgrade head. However, that's for a later part, but for now, we can expose the database and run an Alembic migration from our codebase repo.
k -n databases expose service content-db-rw --name=content-service-db --port=5432 --type=LoadBalancerIf you're running Kubernetes in the cloud, you should get a static IP assigned to this exposed service. If you are hosting on premises, you'll need a load balancer configured for the cluster that can assign an IP address to use. If you use minikube or kind, you can use the appropriate cli command to expose this service on your local device. With the exposed IP address, you can modify the database URL:
postgresql://content:<password>@<ip-address>:5432/content-dbSave this as the DATABASE_URL environment variable and run the alembic upgrade head command. If all goes well, you should see output showing the successful results of the migration, creating the necessary tables. Don't forget you'll need to update the ASYNC_DATABASE_URL and DATABASE_URL in your secrets manager, so workflow-service can connect to the newly deployed databases. Typical secret files, for example, from the external secrets operator, can sync secrets on a time interval or be reapplied to grab the latest value.
Once the secret is updated, restart the deployment by running the following command:
kubectl rollout restart deployment workflow-serviceIngress
So far, we have our frontend and backend applications deployed with required secrets, configuration, and supporting database. However, recall our applications have service types of ClusterIP and aren't accessible from outside the cluster. Hence, we employ an Ingress object to expose our internal services to external HTTP and HTTPS traffic. To employ an Ingress object, we need an Ingress controller. We will use the ingress-nginx controller, a community edition of nginx-ingress for this series.
Here's what our final result will be:
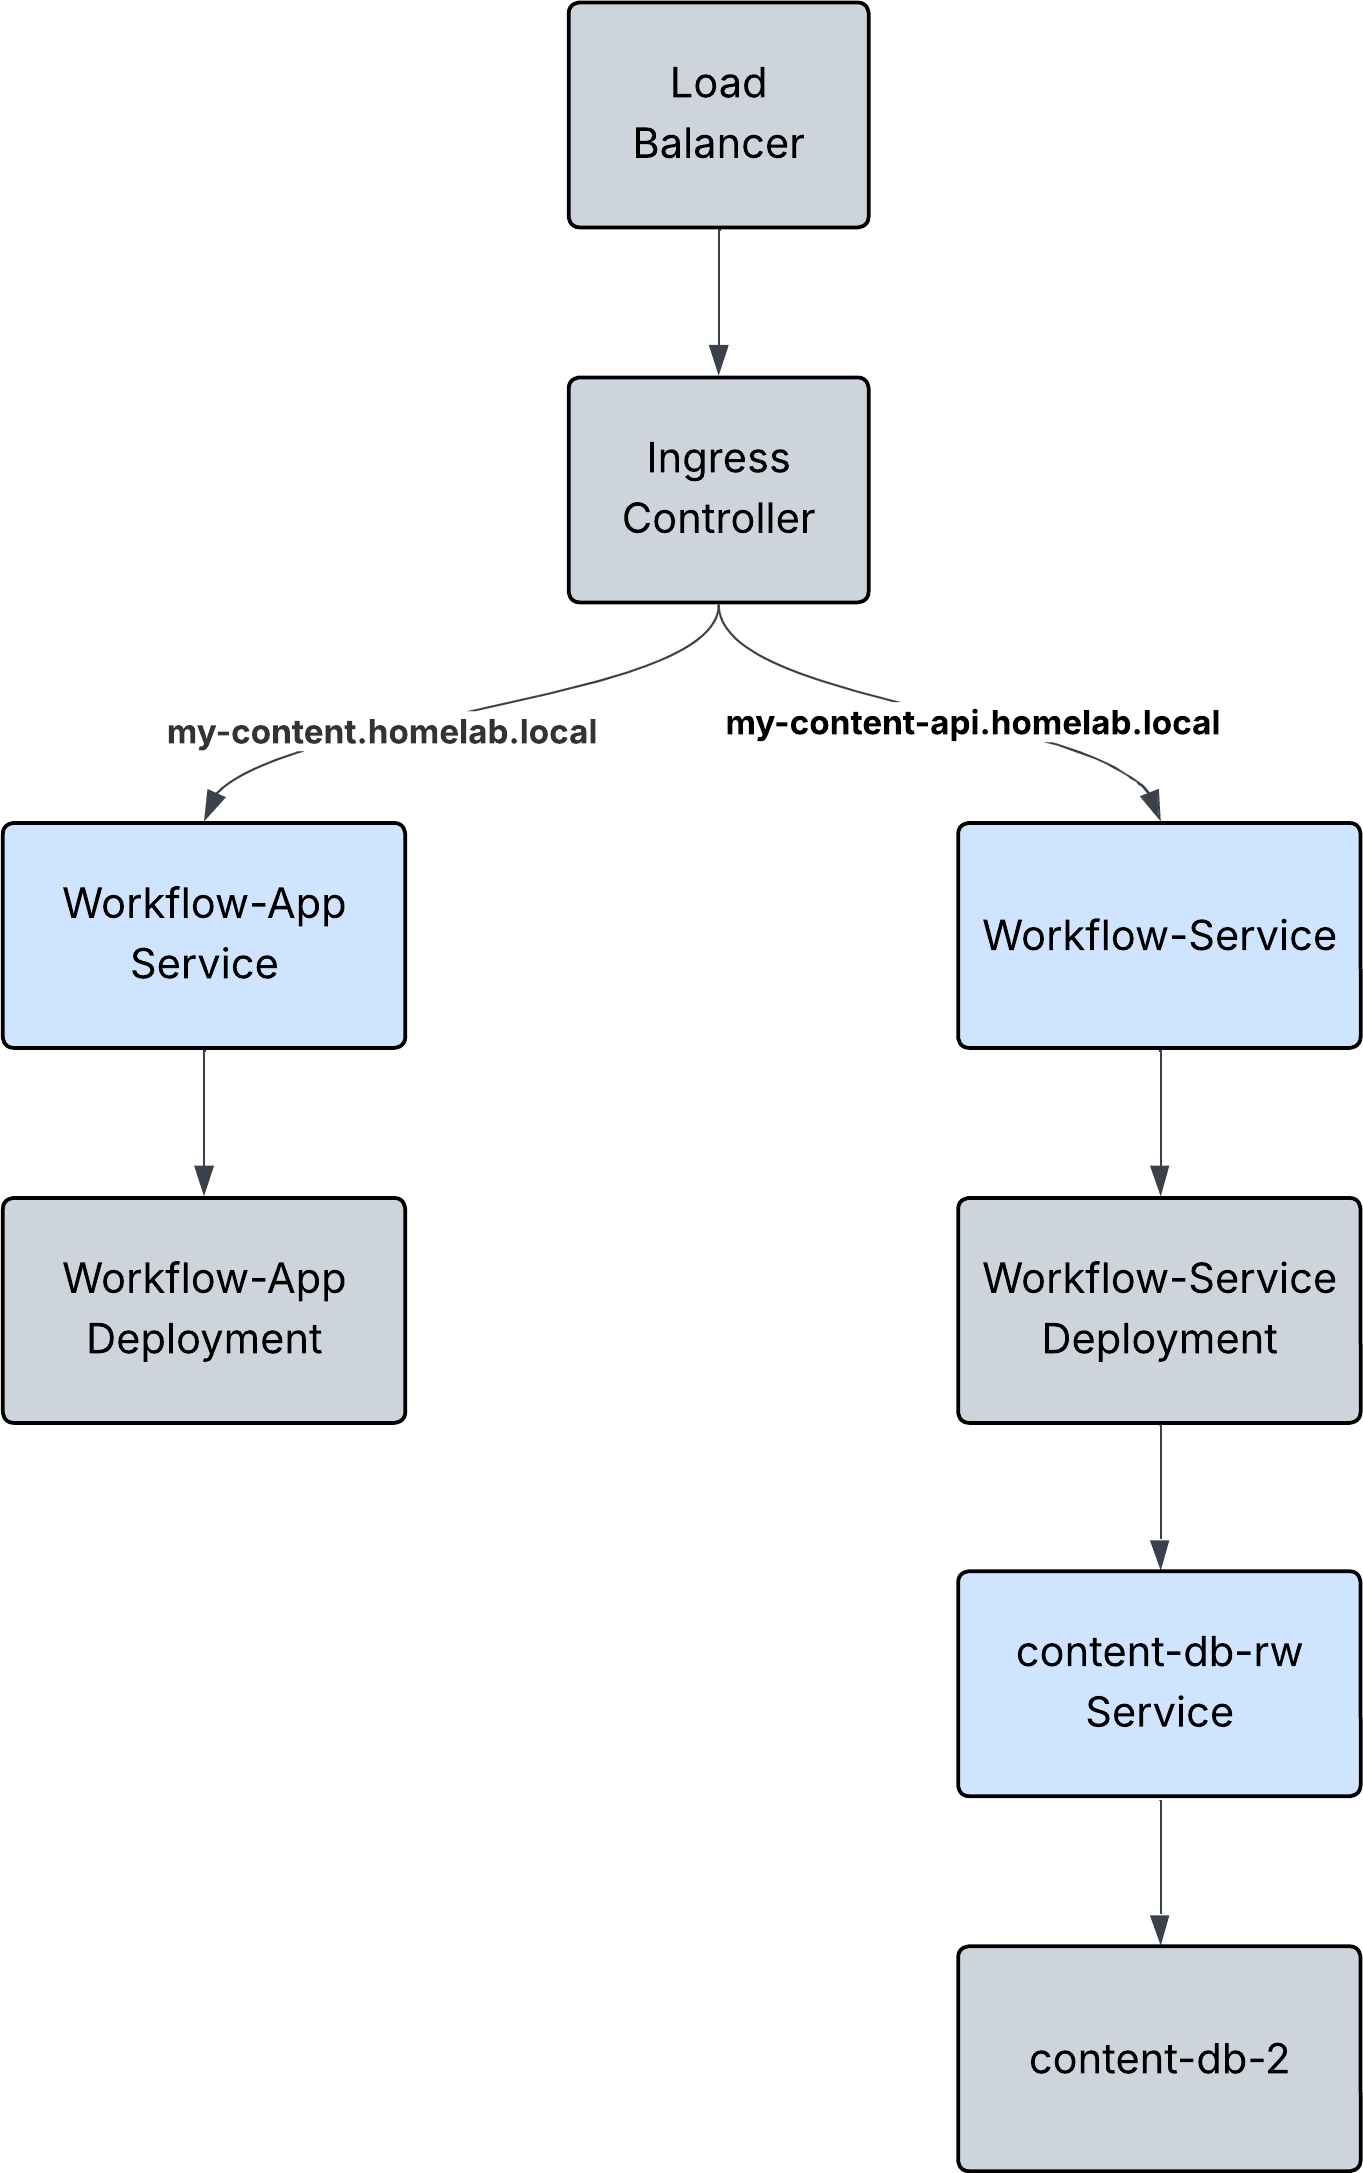
Install using the following command:
helm upgrade --install ingress-nginx ingress-nginx --repo https://kubernetes.github.io/ingress-nginx --namespace ingress-nginx --create-namespaceWith an operational ingress controller, we can define ingress objects to expose our internal services. For example:
apiVersion: networking.k8s.io/v1
kind: Ingress
metadata:
  name: workflow-ingress
  annotations:
    kubernetes.io/ingress.class: "nginx"
spec:
  rules:
  - host: my-content-api.homelab.local
    http:
      paths:
      - path: /content
        pathType: Prefix
        backend:
          service:
            name: workflow-service
            port:
              number: 80

  - host: my-content.homelab.local
    http:
      paths:
      - path: /content
        pathType: Prefix
        backend:
          service:
            name: workflow-app
            port:
              number: 80
As before, we define the four parts of a manifest:
- apiVersion: netowrking.k8s.io/v1
- kind: Ingress
- metadata
- Name our ingress
- Add Kubernetes annotations to define the ingress class
Within the ingress spec, we define a set of rules. For some context, the ingress will be assigned an IP from the load balancer. I use Pi-hole as my DNS server for my local network and have custom .local domains pointing to the IP address of my ingress. You can do something similar, or if you are on a Linux or Mac, you can edit /etc/hosts and manually add a rule to match the IP address of your ingress to a URL of your choosing. Windows has a similar option, but you'll need to research how to do so.
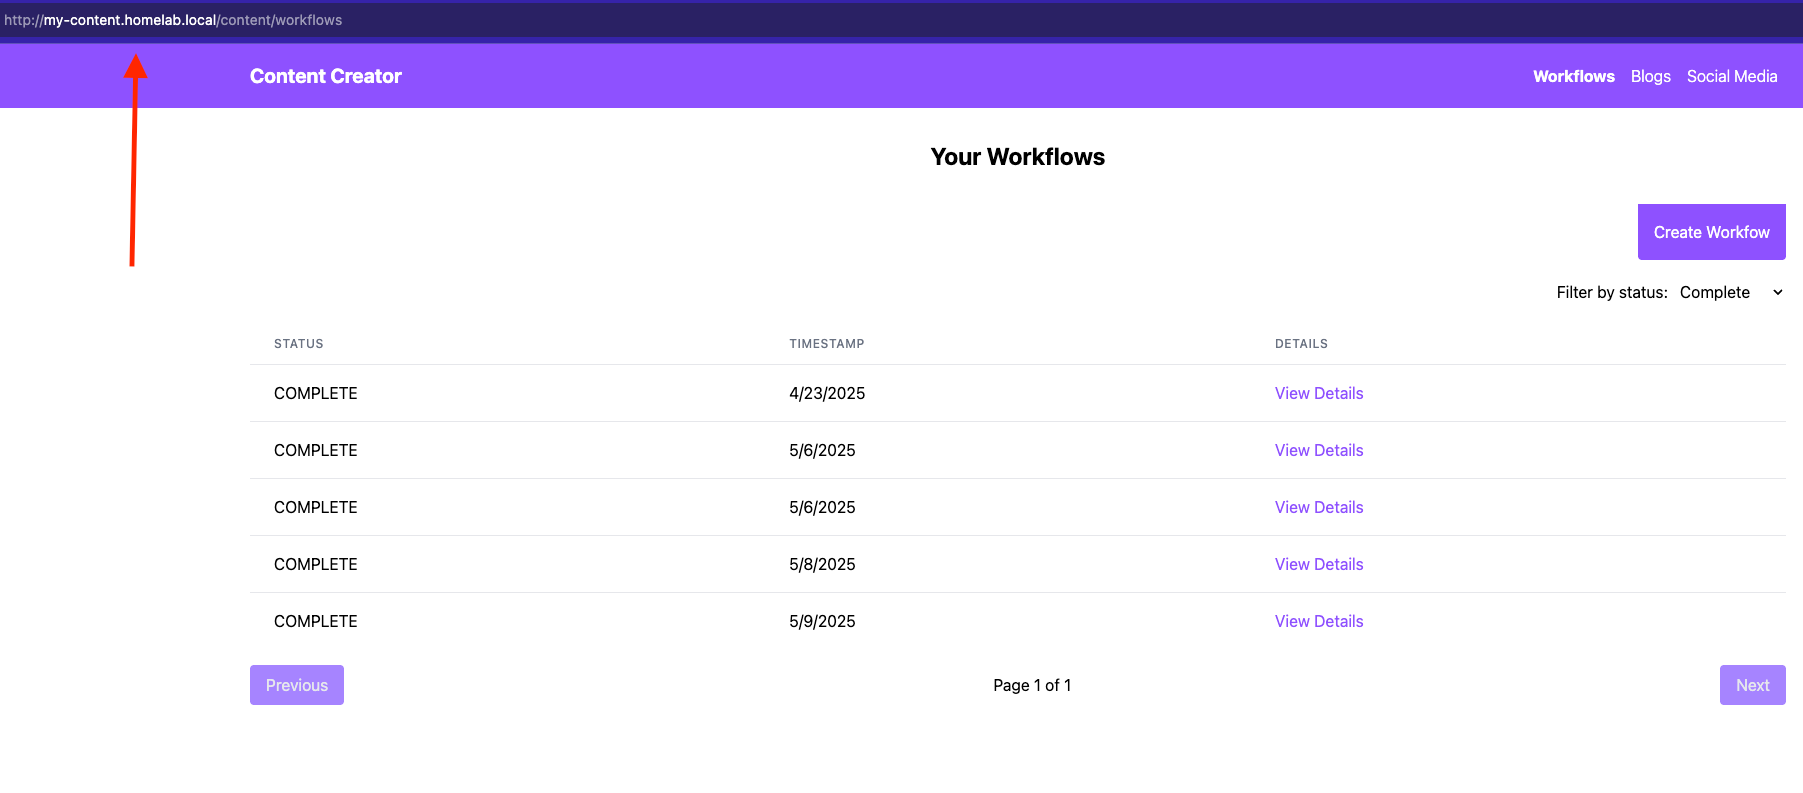
The ingress controller will read the path and route it to the correct service to handle the request. For example, if I visit my-content.homelab.local/content I will see the React application we made in the previous post. Similarly, after establishing the ingress rules, you should redeploy your React app with the new api url. Within the content_assistant_web folder, we define a .env file containing PUBLIC_CONTENT_SERVER and PUBLIC_WEBSOCKET_CONTENT_SERVER variables that get consumed in the configuration file for this app. Update those with the URL you choose for your setup, and you should see the web app being served and pulling data from your backend service deployed within the cluster.
Summary
This post discussed deploying our full-stack application to a Kubernetes cluster. We began by creating Docker images for the React app and FastAPI server. We then created Kubernetes deployment and service manifest files. Additionally, briefly explored running Postgres within Kubernetes using the CloudNative-pg operator. Finally, we configured an Ingress controller to expose our apps and services to external traffic.
What's Next
Thank you for tuning into part 5 of the AI Content Creator series. As the series moves more into the operational side of running generative AI applications, I've decided to pivot and work on a home lab series to supplement material that would distract from the series but are important if you want to self-host your solution. I also recently created a RAG-based finance agent, which I am writing about.
Subscribe to my newsletter for free to get notified when new content is released! Subscribers can also comment directly on posts.
Check out my GitHub for the complete implementation. I look forward to any feedback and discussions. I am currently a Software Architect at Groups360. Feel free to connect with me on LinkedIn.